Baking on a Snowy Winter’s Day

The nice thing about wintertime — well, one nice thing about it — is that one is, if already kitchen-oriented, inclined to take on kitchen projects that you wouldn’t do at other times of year because you’re at home, it’s cold out, and you feel a need to do cozy odd things like attempt to make clotted cream. The bad aspect of this sort of thing is that in my case, this means your fridge winds up filled with endless little jars and tubs of the results of  these kitchen experiments. For the last few weeks, I have had so much dairy in the fridge I’ve had to make labels for the things I decanted or created in order to tell them apart: “CLOTTED CREAM” “CREAM LEFTOVER FROM CLOTTED CREAM” “VANILLA SWEETENED CONDENSED MILK” “HOMEMADE YOGURT” “COCONUT MILK.” It has gotten quite out of hand, especially when you take into account the tubs and jars of normal leftovers, like the chicken lentil soup (about 3 cups, I need to get someone to eat that) and the two chicken thighs from Friday night dinner and so on.

The three of us have been hanging around the house a lot, these last few February days, which you’d think would result in much of this stuff getting consumed, but last night we had a friend over for dinner and ordered in a large quantity of Chinese food, and it’s gotten so bad that the leftovers had to go in the auxiliary fridge in the basement, which normally holds only cases of seltzer and bags of flour. And that was after I took action to try to clear out space in the kitchen fridge by making a cake. As of this writing (1 p.m., Sunday afternoon, February 12th) all of the Chinese leftovers have been consumed except for a little bit of rice (which my daughter will, I’m sure, be happy to have with furikake on it as a mid-afternoon snack), and half of the cake is gone, too. If I can think of another thing to bake that will use up the last cup of coconut milk, the last of the leftover cream, and maybe that little jar of caramel frosting that’s wedged into the back of the fridge, I’ll feel a lot better about the state of the refrigerator.

In the meantime, though, we get to finish this cake, which I pretty much made up, and which turned out surprisingly well — so well, in fact, that I’ve already had requests to make it again.

The goal, when I started on this cake, was simple: bake a cake that will use up the rest of the store-bought yogurt. I eyeballed it and estimated it was about 1 cup of yogurt. (It turned out to be precisely one cup of yogurt, which I felt pretty smug about.) I said to my daughter, “I am going to bake a cake. How do you think cinnamon cake sounds? That sound good?” She said yes, so I began to think about cinnamon cakes, and I wondered about pound cake. I did some research in books and online and realized that I wasn’t really game to do a proper pound cake. The good pound cakes I make — they’re stupendous, but they require things like “whip 8 egg whites in one bowl, 9 egg yolks in a separate bowl” and I just didn’t have the patience for that kind of thing. I remembered a King Arthur Flour recipe for a brown sugar pound cake, and decided to model my cake after that. It’s a fairly simple cake that isn’t a true pound cake to me (it doesn’t have the same velvety crumb) but it’s good and the brown sugar gives the crust a really nice burnt-sugar flavor. The cake I made was baked in a Bundt pan but I’m sure you could do this as a loaf cake, as rounds, as whatever you wanted.

The list of ingredients:

2 sticks butter; 2 jumbo eggs; 1 cup light brown sugar; 1/2 cup granulated sugar; 2 tsp. vanilla; 2 cups flour; 2 tsp. baking powder; 1 tsp. baking soda; dash of salt; 1 heaping tablespoon cinnamon; 1 cup plain yogurt

Preheat oven to 350°. Butter the baking pan(s) of your choice; I used a 10 cup Bundt-pan.

Cream the butter; add both sugars and whip together until they’re smooth and fluffy. Add eggs one at a time, mixing thoroughly after each addition and scraping down the bowl once or twice. In a separate bowl, whisk together the dry ingredients (flour, baking soda, baking powder, salt, cinnamon). Add the vanilla to the butter and sugar and eggs, and then  add half of the flour mixture. Be sure to scrape the bowl down. Pour in yogurt; mix; add second part of flour. Combine again, scraping the bottom and walls of the bowl. Pour batter into pan(s); bake until cake tester comes out clean or cake hits about 200°. (In a Bundt pan, this took about an hour.)

Pulling this cake out of the oven was a pleasure; it smelled so ridiculously good, even if there wasn’t any chocolate in it. All of us have been eating slices of it all day long; to my daughter, it’s a perfect snack cake to have with a glass of milk; my husband thinks it’s a perfect match for a cup of coffee.

It tastes strongly of cinnamon and brown sugar, though my daughter suggested I might want to go with more cinnamon next time. I realized this morning, as I had a second slice, that it reminded me a lot of the Drake’s Coffee Cakes we used to get when I was little. True, they are fundamentally different things: my cake was not a soft yellow cake with a grainy, sugary streusel topping, but somehow the two cakes are related.

It occurs to me that this is the kind of cake that can probably be altered a million different ways. I could do another one and use up the coconut milk in it; leave out the cinnamon but throw in some shredded coconut, a little extra vanilla? The basic formula remains stable: two cups of flour, some baking powder, some baking soda, two eggs, two sticks of butter, two cups of sugar, one cup of dairy, and — flavoring. Whatever the flavoring is, don’t be stingy with it.

This is a cake that works well, but not well enough, to distract a middle-aged woman from dealing with the hell of making Valentine’s Day cards for her child to bring to all 25 of her classmates at school. To achieve the kind of numbness necessary to survive that, I’m afraid something more drastic is called for. Something along the lines of Everclear in a tall glass. Obviously this isn’t happening (and the previous sentence was, also, obviously a joke, don’t worry: I’m not much of a drinker to begin with, and I’m definitely not someone who’s gonna be drinking Everclear) so I suppose I should cut myself another piece of cake and face the glitter glue.


Kimball Brook Farm Milk: For When You Can’t Fly to England?

Americans with an interest in English cookery are aware that there are dairy products that are normal in England that basically don’t exist in America. For one thing, there’s clotted cream. For another, there’s double cream. These are creams that have a significantly higher butterfat content than any of the conventionally-available American forms of cream (light cream, half-and-half, heavy or whipping cream).

Those of us who have eaten the real things in England know that once you’re back home in America there’s really no way to get your hands on any of this stuff. It’s a sadness to which one becomes resigned. You have to maintain a stiff upper lip about these things.

So it comes as a shock to buy a carton of milk at the store, bring it home, and find at the neck of the bottle a dairy product that you regard as impossible to obtain in the US. When I bought this milk and brought it home, I had no idea that I would find white gold stuck in the neck of the bottle.  I tasted a little of the cream, gawped, and used some of it to make carrot pudding. I spent a long time reading online about butterfat percentages and different types of cream, trying to establish some ideas regarding what kind of cream this really was.

I had no butterfat numbers for this product; but I did have the means to reach out to Kimball Brook Farm and ask them questions. So I did.

I had a lovely exchange first with a farm staff member and then I got transferred to one of the farm’s owners. I learned a great deal. My basic question was, “Hey, is the stuff on top of your whole non-homogenized milk double cream, in the English sense?” It became clear that the woman I was writing to didn’t understand what was meant by double cream, so using the information at this chart I rephrased, asking if they had percentages regarding butterfat content of the product (actually the two products that came in this one milk bottle).

The farm owner told me that the whole milk is usually 4% butterfat, but that the cream at the top of the bottle is 40-45% butterfat. This would put it in the double cream range, according to the WhatsCookingAmerica information. They say double cream is 48% butterfat. So not identical — but close.

Before I’d learned about the very high butterfat content in this stuff, I decided to jump in with two feet and attempt  to make yogurt with a mixture of the cream and the milk. I had to decant the milk into another container so that I could cut the milk carton with scissors to get at the cream: there was no other way to get at the cream. Using a skinny silicone spatula and a Hello Kitty chopstick, I scraped out about 1/4 cup of cream; I then added milk to make 2 1/2 cups, and put it in a pot to come to a boil. As soon as the cream began to melt, a yellow buttery film appeared on the surface of the milk. “Okay,” I thought, “this is going to be weird.”

And weird it was. I boiled the milk, cooled it to 110°, and added the yogurt starter as you’re supposed to do, and then I decided to do as a friend of mine does and just let the yogurt ferment in the Dutch oven where I’d boiled the milk. It seemed like a good idea, and if I’d been paying closer attention to maintaining the requisite warmth around the pot, I’m sure it would have proven to be a brilliant idea. But in my case, I got distracted by other things, and what happened was, when I checked on the yogurt around 5.30 yesterday evening, what I had was slightly yogurty-smelling milk with little yellow bubbles of butterfat floating on top. Cue Kevin Kline. It wasn’t that it looked scary or smelled rancid or anything like that; but it was plainly not right.
So: Operation Yogurt Rescue commenced. This meant trying again by letting the yogurt warm up to 110° again. It took a little maneuvering and juggling to do it, but I did it; in the end I transferred the stuff into a glass jar, wrapped the jar in towels, put the jar and towels into a clean Dutch oven with a lid, and put the whole shebang into a pre-heated oven (as low as I could get it, 170°). Then I left it there overnight. “We’ll see what happens,” I said to my husband. He replied, “Look, if it fails, don’t agonize over it, ok? It’s just some milk.”
This morning, I was awakened by the cats and staggered into the kitchen to feed them; while they snarfed their yummy slop, I opened the oven and pulled out the Dutch oven. I was not exactly optimistic about what I’d find. To my considerable surprise, the yogurt had thickened, beautifully! It was definitely yogurt-textured. Sure, it still had the weird buttery dots on top of it, but it was definitely yogurt.
Late in the morning, I baked a yogurt cake using the top several tablespoons of yogurt; the cake, which I dosed with some vanilla and cinnamon, came out a delicious, slightly sweet snack cake. What shocked me about the yogurt was that once I’d used the buttery layer of yogurt at the top — which was also slightly grainy-looking — the yogurt that remained in the jar was so smooth, and so rich, it was shocking. It was also rather more tart than I expect my homemade yogurt to be, probably because of the long fermentation period. But no matter: this stuff is lush. If I strained it to make yogurt cheese, it would be the yogurt cheese of the gods.
The graininess of the top was a little off-putting. I read up online about this grainy quality in yogurt. The consensus was that you could just whisk the yogurt and that graininess would disappear; this was exactly what happened when I whipped those top tablespoons of yogurt before using them in the cake. It was definitely unappealing, but clearly a non-issue if you just stirred the yogurt after it had chilled.
In the meantime, we ate the snack cake and I got another message from Kimball Brook Farm, this time from the person who does all the in-store tastings. She wrote that she thinks I’m basically correct about the cream-on-top being more or less an analogue to British double cream, though the numbers are not precisely matched. She admitted that she’d never personally made yogurt with any of their products, but said — and this was exciting — that she had made clotted cream at home. She gave me a link to a recipe, and said, you have to use the heavy cream to do this, but here’s how you do it.
Naturally, when I was downtown yesterday, I picked up a bottle of the cream on top milk and a bottle of the heavy cream. My husband, opening the fridge last night, said, “You know, I remember ten years ago, you were someone who only bought 2% milk; you would yell at me if I bought whole milk. And now you’re buying heavy cream with abandon.” “I’m going to try to make clotted cream,” I said.
He didn’t complain.
It turns out you have to keep your oven at 180° for 12 hours straight to make clotted cream. This means it’s something I can’t decide to do just any old day. However, I have announced my plans to my husband, and so, probably after dinner on Friday night, I intend to turn the oven on, pour the cream into a pan, and then…. see what happens.
I will report back.

A Holy Grail: How to Make the Entenmann’s Chocolate Chip Cookie at Home, or, Ok, it’s not EXACTLY the same but it is damned close

As a child, we almost never made cookies from scratch. My aunt taught me how to make something called Chocolate Pinks (chocolate cookies with pink frosting) that we found in a cookbook (I should Google it and try to figure out where it came from, and make them again and see if they’re any good). My brother used to make chocolate chip cookies sometimes. But 99% of our cooky consumption was store-bought boxed or bagged cookies. Some of them were wonderful and some of them were pretty crappy but we loved them anyway and some of them we bought and then hardly ever or never got again because they were so uninteresting.

The Platonic ideal of the chocolate chip cookie was the Entenmann’s chocolate chip cooky. They were small, soft, generous with the chocolate chips, and had a real, genuine brown sugar taste and texture to them. They were wonderful. My brother and I could eat an entire boxful in one sitting. But they were expensive, as store-bought cookies went (and go today), and so they were a once-in-a-while treat.

I’ve long wished I could just live on Entenmann’s chocolate chip cookies. In recent years it’s occurred to me, I’m a good enough baker now, I could maybe try to make cookies that good on my own. But I never thought hard about it. To be honest, I just didn’t believe it was possible. But the other day I decided to give it a roll. I Googled “soft chocolate chip cookies” or something like that and scrolled around a bit and eventually I landed on a website that had a cooky recipe titled “The Best Soft Chocolate Chip Cookie.” The photos — of which there were many — did indeed look more or less like Entenmann’s chocolate chip cookies. So I took out a stick of butter and an egg and did some thinking.

The list of ingredients was this:

  • 8 tablespoons of salted butter
  • ½ cup white sugar (I like to use raw cane sugar with a coarser texture)
  • ¼ cup packed light brown sugar — I used 1/2 cup brown sugar, which was a big deal I think.
  • 1 teaspoon vanilla
  • 1 egg
  • 1½ cups all purpose flour (more as needed – see video)
  • ½ teaspoon baking soda
  • ¼ teaspoon salt (but I always add a little extra)
  • ¾ cup chocolate chips (I use a combination of chocolate chips and chocolate chunks)

What you do is, you preheat the oven to 350°, and you set up a couple of baking trays with parchment paper. Then you soften the butter so it’s almost liquid, and you cream the butter with the sugars in your mixer (or do it by hand, whatever, I don’t care). I used 1/4 more brown sugar than the original recipe called for, which I think was a significant change — I really wanted that brown sugar taste to be strong. Add the egg (I used an extra-large egg) and the vanilla. The original writer says that if you beat this for too long it toughens the egg and makes for a stiff cooky; I have no idea if this is true, but I’m reporting it just in case.

Then you mix in quickly and completely the dry ingredients, which you’ve whisked together (the flour, baking soda, and the salt). Then you add the chocolate chips. The dough will be a very soft, cohesive blob in the mixing bowl.

Take the dough by the teaspoonful in your hand and roll nice little balls. Put the balls on the baking sheet about an inch apart from each other, and press them down ever so slightly to flatten the tops a tiny bit. Bake these cookies for about ten minutes. The tops should look dry, but alarmingly close to uncooked. You will think, “Damn, these are still raw.” Nothing should be golden brown — you know how some cooky recipes say “bake till edges are golden brown”? Sometimes, that’s a good thing, that’s what you want. In the case of the soft chocolate chip cooky, it means you have gone too far and have made a cooky that will not be soft or chewy once it’s cooled. It means you have wasted your time and effort and ingredients. We will not discuss it further.

Let the cookies set on the baking tray for a few minutes to cool before you transfer them with a spatula to a baking rack. You can eat them now that they’re not scalding hot, the chips will remains melty for a while yet.

These are without any doubt in my mind the best chocolate chip cookies I have ever made. My husband, who is not a worshipper of the Entenmann’s chocolate cooky, but knows it well, said that it was absolutely clear these were the best possible approximation of the Entenmann’s cooky as could be produced by a home baker. I baked two dozen of these cookies (the original recipe, which tells you to make the cookies big, produces between 9 and 12 cookies, according to the author) and they lasted all of two days. Writing about them right now, I wish I had about five of them to eat all by myself, and I would make more, except I made a chocolate cake yesterday and I’ve got to be responsible about these things.
But as soon as the cake is gone, I’ll be making more cookies.

Sour Cream: No Sour Grapes

A few months back I read a new Jewish cookbook — The Gefilte Manifesto — which had in it instructions for making your own sour cream. It seemed to me that it would be rather pointless to do this, but on the other hand, it would take almost no effort to make the attempt and see if it might possibly be worth doing. So a few days ago I did as instructed. I took a cup of heavy cream (the best cream I could find, which has no added thickeners or other mishegas in it) and a half a cup of buttermilk (again, the best stuff I could find) and I put them in a jar with a lid and I shook them together, hard, for a minute. Then I left the jar on the counter top and waited.

Eventually, this stuff turns into sour cream.

It took about six hours for me to have the nerve to open the jar and see what would have developed inside. It turned out to be a combination of things. The top inch or so was thick, fluffy sour cream that tasted lovely, and the rest of the jar was filled with runny sour cream that seemed like a good useful product to me, but not to anyone else in the family. When we had latkes for dinner, I was the only one who’d use this sour cream. In other words, this was an interesting experiment, but not one that is likely to be often repeated unless I am willing to figure out a way to thicken the product (I glean that this is easily done with unflavored gelatin, but do I really care?). It turns out that I know a woman who makes her own sour cream all the time. She admits it’s not the same thing as storebought, but loves it on its own terms; I tend to think that I’m in that camp. It’s not “sour cream” as we’ve all been raised to think of it, but it’s a very good thing if you accept it for what it is.

In the end, I worked out a process in which I’d use the top layer, then shake the cream again and let another top layer develop, and so on and so on. It was not unlike the way when you toast marshmallows, you can toast the outside, slip it off, eat it, and then re-toast the marshmallow, and take off the “skin” and start over and over again until you’ve eaten the whole marshmallow. But it was silly, if I was the only one going to eat the stuff. I decided, after a few days, that I’d be better off just using the sour cream up in some recipe, because homemade sour cream doesn’t last very long. No preservatives, don’tcha know.

It was time for me to set up a loaf of bread, and I decided on a whim that it could not possibly hurt to use the sour cream as the primary dairy product in the bread. I’m talking about my usual pain de mie, the bread we use for breakfast toast and sandwiches and all that. Instead of adding dry milk and regular milk to the dough, I just threw in the last of the sour cream (it was about one cupful), and prayed. The dough was rather slow to rise at first, but after the first knocking down, I knew everything would be fine. I did my usual three rises, and when we baked the bread we wound up with this incredibly, ridiculously, tender loaf of bread that has been almost entirely consumed after two days. People keep coming up with excuses to eat toast. My daughter’s been asking for toast with butter and capers to have as her afternoon snack. My husband’s been eating it toasted with cream cheese and sliced green olives. It’s nearly gone.

I’m almost wondering: is it worth it to make a second batch of this failed experiment just so I can use it in more bread?


Chapter Three: The Knives are All Right.

As someone who cooks food with depressing regularity, and, therefore, uses knives — sharp, scary, dangerous knives — on a daily basis, I couldn’t go indefinitely without decent, workable knife storage. Storing them in a drawer: not a viable option, according to both my husband and me. There was no point in hoping that my husband would somehow miraculously come around to the idea that a magnet strip on the wall was the best way to store our knives. The knife block was a nuisance and a failure; the (ahem) novel Book-Based solution was interesting, but as implemented by me, a failure. I had to devise a countertop solution that wouldn’t make me or my husband crazy and would still be a safe, reliable, reasonably attractice way to store the knives. A Google search about DIY knife storage — which showed me the Book-Based Solution — also showed me a Vase-Based Solution. This seemed like a good avenue to pursue; and by this point, I was up for anything. So I began keeping my eyes peeled at tag sales, looking for vases that would work to hold knives. What I needed was at least two, and probably three, glass vessels that didn’t curve in at the top (as so many vases do). They needed to be wide-mouthed vases easily washed, that would be big enough to hold even wide blades of chef’s knives.

People are always getting rid of vases when they move, probably ’cause they’re a pain in the ass to pack. I knew if I just roamed the streets of my neighborhood, I’d eventually find exactly what I wanted. And then one day a Facebook post in a group I’m part of brought me what I needed.

It’s a local group called Curb Alert and it lets folks know when someone’s put some cool item out on the street free for the taking. Living in a college town, this is quite common. Someone’s moving and they can’t take all their stuff;  they’ll put out boxes of things — often kitchen equipment, but it could be anything — books, baby gear, stereo equipment  pieces of furniture — tape up a sign saying  “FREE STUFF” and move on. Anyone who’s lived in this town has benefitted from this system: it’s an easy way to get rid of things you don’t want, and it’s an easy way to acquire things you might actually need. Yes, there is furniture in my house that’s come to us via the curb; and if you’ve eaten at my house, you’ve probably eaten from pots or plates that I’ve acquired in this manner. I realize that many people would find this appalling. I truly don’t give a crap. It’s a beautiful little ecosystem and I love it.

So when a hipster couple across the street from me began to post photograph after photograph — Free stuff! Come and get it! — I hustled out to the sidewalk. It was late July. This couple had lived in their apartment for several years, long enough to acquire all sorts of housewares, but they were moving to North Carolina, via U-Haul, and just couldn’t take everything with them. I walked across the street and within about two minutes I had snagged three clear glass vessels. Two of them were vases. One of them was some kind of special mixology carafe marketed by St. Germain — an odd shape, rather narrow but quite tall — and though I didn’t really want an ad for St. Germain in my kitchen, I knew immediately that it would be the perfect thing to hold my bread knife. I took home my three pieces, practically chortling at how easy this was, and I washed them and dried them. I took a piece of very old, soft, flannel (a pillowcase that had gotten holey, which I’d converted into rags) and folded up small squares to line the bottom of each piece — I didn’t want to have the tips of the knives hitting glass — and then I filled them with white rice. (White rice is cheap enough, I reasoned, that even if this experiment failed, it wouldn’t be much of a loss. Furthermore, since I’d cleaned the vessels so well, there wouldn’t be any reason I couldn’t actually cook the rice, should we decide against the Vase-Based Solution.)

The glass vases are very different in shape and so it was easy to determine which knives would go into which piece. The tallest, plainest one was perfect for the three chef’s knives; the St. Germain decanter was for the bread knife; and it turned out the short, squat one was very happy to host my numerous paring knives and the one oddball small serrated knife I like to have around. Installed in these containers, only one handle stuck up so high that I could not nestle the vases on the kitchen counter under the shelf where we keep our spices. Sadly, the handle of my left-handed bread knife is too long to allow the knife to fit comfortably in that space (the handle is about 1/2″ longer than the other bread knife’s handle); but I don’t mind keeping that in a sleeve in the kitchen drawer, as I only use it once a week at Shabbat. But nine knives out of ten fit well: I declared the initial set-up a success.

I’ve now had the knives in the Vase System for four months. There are a number of good things about this admittedly odd knife storage system. One is that it doesn’t take up space in the same way the knife block did. It’s space, to be sure, but the way the space is allocated bothers me less. For example: when I wanted to wash the whole countertop (as I do after working with some really messy dough, for example), moving the knife block with the knives in it was always kind of scary. With these vases, it’s easy. Each vase can be easily lifted and set down somewhere else, and I don’t feel like I’m risking lopping a hand off by accident doing so.

In the case of the short knives, I don’t have to move the vase at all to get out the knife I want to use; and with the taller knives, I find pulling the decanter out to get a knife is no big deal. I also like that this system keeps the blades in a very dry place. I wash and dry my knives by hand but any residual dampness in a wooden handle will be absorbed by the rice, or evaporate (with the knife block, I was always fretting to myself about wood possibly getting wet and staying wet and getting gross as a result).

The more aesthetically-aware types who use the Vase Solution and want to have the rice look like something other than rice will find that there are many ways to fill the vases and have this system work. Some people use dry beans — which come in many attractive colors and look cute. Some people use bamboo skewers instead of foodstuffs, which makes a great deal of sense, and I will probably acquire a couple hundred skewers one of these days to allay my concerns about rice and mealworms (we’ve not had any trouble, but we are always on the lookout). One could dye the rice to make it match one’s kitchen decor, but that’s a little too too for me to bother with.

I can easily see that most people would not find this an acceptable knife storage system. However, given my strong feelings regarding how unacceptable the conventional options are, I really don’t give a hoot. And people who are, like me, endlessly annoyed by the more conventional options might give this one some thought. Because, as I say, it’s been a few months, and so far so good. This is a huge improvement over the daily misery I felt every time I looked at the knife block — which, I admit, I kept, out of a nagging sense of fear that I’d need it again if my other knife solutions failed.

I am confident enough about the vase solution that one of these days I may post my own Curb Alert on Facebook: Knife block out on the sidewalk, yours for the taking. 

Knife Storage is a Pain in the Ass. Chapter 2: In Which the Hausfrau Got Slightly Crafty

The hausfrau is not the sort of person who mucks around with hot glue guns or sews cunning aprons from old pillowcases. It would be nice, but whatever. But back in May, a friend on Facebook brought to my attention a knife storage system that I thought even I could handle making. The idea was, you’d take a few old, fat books you didn’t need to read anymore, and use them as knife blocks. I immediately grasped the sense behind this plan, and thought, “I’m gonna give that a roll.” I went and got three very old cookbooks, used damp string and rubber bands to tie them shut very tightly, and started jabbing knives into the text blocks. For the shorter knives, the paring knives, this system worked very well. But, I wondered, was I doing damage to the knives? (The resale value of these books was zilch; I wasn’t going to use valuable books for a project like this. The knives, on the other hand: I didn’t want to deal with having to replace knives because I’d ruined them on a stupid pseudo-crafty kitchen project.)

I went to my computer and emailed a nice young man in the neighborhood who is a professional knife sharpener. His name is Harper. I met him last year or maybe two years ago now, when I heard that he would be sharpening knives at a farmer’s market. I had, at the time, recently realized that my knives were all in really unforgivably awful condition. We have an electric knife sharpener, and I like it, but it was clear to me that most of my knives needed professional help. I brought Harper most of my knives, hoping for the best, and was more than happily surprised. Every knife he worked on was a pleasure to use afterward. With these rejuvenated knives, I got more attuned to using my sharpener a little more regularly, and I started sending as much business as I could toward Harper’s stand at the farmer’s market.

Harper is a gentle eccentric, it seems to me — I expect his family worries about him — but he is someone I’m always happy to run into around the neighborhood. I think he goes to Yale, but can often be seen hanging around with his wonderful dog Lola. I don’t know how he came to be a knife and tool sharpener, but he’s definitely good at it, and, I learned, he is friendly about it. I know this because I’ve chatted with him many times, on the street.  When I got this idea about the book knife block in my head, I sent him an email. I was afraid he might think I was insane, or a moron, but I figured, “You know someone who has the knowledge you need access to; just ask him, maybe he’ll write back.” I wrote, basically, “Dear Harper, Is this book-knife block thing an incredibly stupid idea, or a perfectly ok idea? Is it gonna hurt the knives? Is there some fatal flaw I’m not thinking of? Please advise. Love, The Hausfrau.”  I was a little more formal than that, actually, but not much.

To my surprise, Harper wrote back pretty quickly. He assured me that the issues I had asked about — would the ink possibly harm the blades? would the act of putting the knife into the text block repeatedly dull the blade? — would not be problems. We had a nice little back and forth, agreeing that some book pages would inevitably get crushed or slashed by moving the knives in and out of the block; we discussed the question of top-heaviness, and whether or not the “block” should be put through a bandsaw to angle the bottom of it slightly and make it a little more stable. He even offered to help me out with this, which was really nice of him.

My husband came home and saw the “knife block” on the counter and was, to put it mildly, skeptical. He didn’t actually say, “That’s an incredibly dumb idea,” but he clearly believed it was.

We agreed to live with the system for a little while to see how it would work out. After about six weeks, I had feelings on the matter; if my husband did, he never voiced them (which means he did not approve, but had better things to pick arguments about with me).  The problems were subtle but definite. For one thing, the widely varying lengths and sizes of our knives meant that sometimes a knife would fit nicely into a book; in fact, one old book held most of the smaller knives quite nicely. But for chef’s knives, it would have required a lot of books — and, more significantly, a lot of counter space — to make the system work well. Also, the books had to be pulled out from their home on the counter before I could pull out the knives, which was a nuisance. I discussed with Harper the idea of sawing off the bottoms of the books to angle them slightly and make them sit in a fashion more like a traditional knife block; he offered to saw the books for me since, for some reason, he has easy access to a bandsaw. But it just didn’t seem worth it to me. I decided that the system was cute but for a household with very limited countertop space, too flawed. I decided to continue my hunt for a better knife storage system, and thought back to the time I had spent doing Google searches for terms like “DIY Knife Block.”

One website showed me a kind of knife block that wasn’t a block but was some kind of silicone gizmo that looked like very tall astroturf; you slid the knives into the “blades of grass” and it supported the knives safely. This seemed like a clever idea, but I didn’t relish the idea of having to clean out such a gadget (and it was, in the end, no more than that — a gadget, and not a DIY one at all).

A similar idea held a little more weight with me. This was a concept in which you take a tallish wooden box without a lid, fill it with bamboo skewers, and keep the knives by sliding them in among the skewers. Depending on how nice the wooden box is, this could be a rather attractive way to handle knife storage. But I didn’t want to think about acquiring a handsome wooden box, and, I knew that I’d need one hell of a big wooden box to accommodate my knives, and I didn’t want any one thing that big on my countertop. (That’s part of what I hated about the original wooden knife block to begin with.)

It was the next concept that stuck with me. The next concept involved using vases and raw rice or raw beans. I thought, “Vases and rice are easy to obtain. Furthermore, it requires zero skill to set this up. Note to self: start poking around tag sales for cheap vases.”

I kept the knives in the books on the countertop, but secretly began my hunt. August is one of the big tag sale seasons in my neighborhood: I knew I wouldn’t have to  wait long to put my plan into action.

The Zabar’s Catalog, The King Arthur Catalog, and the Devious Plan in Which Zingerman’s Will Play No Role

As you can imagine, our household receives several food-related catalogs in the mail. I don’t mean food magazines — we actually don’t have any subscriptions to any food magazines right now. I mean catalogs: lists of food items we can buy from various specialty purveyors. We are very loyal to the good people at King Arthur Flour, and Penzey’s, for example. We also get catalogs from Zabar’s and Harry and David (though we’ve never once placed a Harry and David order; I’m honestly not sure why we get their catalog) and I will even count the Vermont Country Store as a food catalog because half the time the things I order from them, in my infrequent orders, are edible.

With the Vermont Country Store, if I’m placing an order, it’s either edible or it’s soap.

We recently received a food catalog I hadn’t seen in a while — the Zingerman’s catalog. Zingerman’s is a famous delicatessen out in Ann Arbor and I’m sure it’s a pleasure to go there but in all the years I’ve looked at their wares in the catalog, I’ve never once been tempted to order something.

Now, Zabar’s: Zabar’s is another thing entirely. The Zabar’s catalog is a situation where 80% of the pages have something I’d happily order and consume in one sitting. I would not sniff derisively at a package of smoked belly lox; I would be perfectly happy to consume their babka, even the cinnamon one; a dozen bagels? Absolutely.

But Zingerman’s. They have all kinds of fancy anchovies and bacon and bread and cheese and none of it rings any bells for me. Ok: the bacon, I guess it’s obvious why I wouldn’t want to order that. But if they had some duck bacon, I might well spring for that: we like duck bacon. But they don’t have any.

And this year, I was opening the catalog with a very open mind, because we agreed that the gifts we give to each other at Chanukkah and Christmas this year should be food-oriented. The idea is that the gifts we give each other will get eaten up or used up, and not sit around gathering dust for the next ten years becoming something I eventually have to throw out or repurpose. This concept was devised when our daughter, now eight and a half years old, ripped the King Arthur Flour catalog from my hands while I was sorting the mail a few weeks ago. “I need a pen,” she said.

“You need a PEN?” I asked skeptically. But I handed her a pen. She promptly settled herself down at the dining table and began circling things. “What is this,” I demanded.

“I’m marking the things I want,” she said. And boy howdy, did she. She wanted mixing bowls and she wanted cooky mixes and she wanted a bread box and she wanted a butter dish and she wanted various kinds of flour. I pointed out that we already own two butter dishes* and a bread box, and that I already have all the types of flour I need, and that with these things, we had no use for cooky mixes. She marked baking pans (mostly USA brand) and a Thermapen. I said, “We have a Thermapen, you’ve seen me use it a million times.” “But this one’s RED,” she said. I couldn’t argue with that.

If we ordered everything from the King Arthur Flour catalog that my daughter circled, we would have to install a second kitchen somewhere in our apartment to hold it all.

But it inspired what would be a much larger conversation about gift-giving this year. And when the Zabar’s catalog arrived a couple days later, my husband and child both paged through it thoughtfully. “I wouldn’t mind getting kippered salmon for Christmas,” my husband said.

“I like cake,” my daughter reminded me.

I’ve been trying to get into the spirit of things. I ordered for myself an expensive (i.e. costing more than $3.50) bottle of tomato vinegar. Tomato vinegar is something I’ve been using very very sparingly because my first bottle is nearly empty and I don’t want to run out of it entirely. (I bought it myself because I am positive no one in the family would think to get one for me as a gift, but it definitely qualifies as a quality gift item.) I’m hatching a plan for my daughter’s Chanukkah presents — I think I have an excellent concept that will be very easy to execute — and I’m slowly devising a list for my husband. If everything goes as I think it should, then we will certainly have some objects sitting around, six years post-Christmas and Chanukkah, but the majority of our holiday loot will be used up, long-since enjoyed, a happy memory.

The best part, really, is that the shopping will be, for once, just as much fun as the giving — even for my shopping-averse husband. I think. Fingers crossed. (Note to husband, if he’s reading this: we could use some new potholders, badly. Those, if they’re nice, I won’t mind if they’re still hanging around  the kitchen six years from now.)

*at the time I wrote this piece, we did own two butter dishes, one of which, regular readers know, has come to an untimely end thanks to the goddamned cats.

Two Butter Dishes. (And then there was one.)

[I wrote this in the early afternoon of November 28, 2016. At ten o’clock that night, everything changed.]

My husband and I have lived together for a fairly long time now and in all these years we’ve always had sticks of butter in the house but only in the last couple of years did we acquire the once-common household item known as a “butter dish.”

When I was a kid, in my parents’ household, the butter dish was actually a plastic dish with a lid and it held sticks of margarine.

I don’t know what they had in my husband’s parents’ household when he was a kid.

But neither of us brought a butter dish to our union, and I genuinely had no idea that this was any kind of an issue until one day in 2013. It came to light that my husband was frustrated deeply by the fact that we did not own a butter dish, plastic or otherwise. I was taken aback but duly noted his woe and made a mental note to present him with a handsome butter dish come his birthday in 2014, which I did. I could have ordered something pretty from a catalog, or gone to Marshall’s and found something inexpensive-but-perfectly-nice, but because I am who I am I spent weeks stalking my favorite vintage kitchen goods shop downtown until a butter dish appeared. Every week I’d go in and ask, “Any butter dishes?” and be told, “Nope, not today.” And then a butter dish appeared. It was heavy, thick, cream colored porcelain and not designed to hold a conventionally-sized stick of butter, which was strange, but I liked the look of it and I bought it. It is perfect for holding a stick of butter that’s had one tablespoon cut off it. (Why? I will never know.) I wrapped it carefully and presented it to my husband as a birthday present.

In the years since then, another butter-related issue has come to light, which is that I am the only member of our household that believes in using unsalted butter on things like toast. It turns out that my husband and child prefer salted butter. This might have thrown me — it definitely annoys me — except for the fact that six months after my husband’s birthday, I was at a concert and there ran into a friend who had in his pocket a glass butter dish. His wife remembered that I had been looking for a plain butter dish, and she’d found one somewhere, and, knowing that her husband would see me at this show, she’d said, “Oh, bring this butter dish with you.” So he did, and I accepted it gratefully, and we came to have two butter dishes in our kitchen.

It was only recently, though, that it dawned on me that having two butter dishes solves the problem of wanting to have salted and unsalted butter available on the counter for spreading nicely on toast. I have taken to keeping salted butter in one, unsalted in the other, and using the kind of marker you’re meant to use to label wineglasses, I write SALTED on one of the dishes. This way, there should be no confusion.

It means that our spice shelf — which is where I keep the butter, not on the counter, per se — gets a little crowded with butter dishes. I’m winnowing down my spice collection, in fact, so as to make room for the butter dishes. (I’m still putting up with the jar of Marmite that lives there, though, because I do grasp that if you’re going to keep butter on the spice shelf, you might as well keep the Marmite there, because that’s how it is here.)

Postscript:
At ten o’clock, a few hours after writing this and saving the draft to post the next day, my husband and I were settling in for the night, he with his enlightening tome on something or other and I with an episode of The IT Crowd, when we both heard the unmistakable sound of glass shattering in the kitchen.

Since our daughter was already out cold in her bed, we knew that the cats — recently acquired, evil cats — were the culprit. What we couldn’t possibly imagine was what had fallen. We rushed downstairs and at first couldn’t see anything wrong but then on turning to look more closely at the kitchen counter, I saw the clear glass butter dish had been knocked to the countertop. The dish was broken; miraculously, no soft, eminently spreadable butter had smeared across the counter. Two cats stared at us with “Who, me?” expressions on their faces.

“You rat bastards,” I said to them.

“BAD! BAD kitty!” my husband said to the stripey one, who stared back at him completely unimpressed.

I took a water sprayer and sprayed the all-black one. “BAD kitty!” I said. He shook off the water and walked away smugly, then sat down to lick his long fluffy fur. Within seconds he looked as though nothing had happened at all.

We cleaned up the broken glass and then retreated back upstairs, speculating that the stripey one had jumped up to the counter to sniff at the butter dish on the spice shelf and knocked it down intentionally without anticipating the chaos that would result. But the truth is, we don’t know. Both of these cats are sneaky little rat bastards, and either one of them is capable of silently hopping up onto the counter, putting their little paws in places those paws don’t belong, and then abruptly wreaking havoc and running away before we can get to the scene of the crime.

“You know what we need,” my husband said to me as we settled in again.

“Two different cats,” I said angrily.

“A stainless steel butter dish.”

Knife Storage is a Pain in the Ass. Chapter One: in which we cannot agree on anything, and I bitch about knife blocks.

Problem: if you have a kitchen, you probably have sharp knives that have to be stored somehow.
Problem: if you share a kitchen with someone, they probably feel that the way you want to store the knives is unacceptable, and the way they want to store the knives is equally unacceptable to you.

I am of the school that believes that knives are best stored on the wall, on a span of magnetic strip. For many years, I lined strong magnets on the wall of the fridge that was adjacent to the short span of counter next to our stove. I found this a completely wonderful system for many reasons. It kept the knives at hand; it kept the knives out of the way of children and other people who shouldn’t handle knives (only grownups could reach this place); and it was just a neat, clean way to store items that would otherwise take up precious horizontal storage space, of which we had essentially none. We had almost no counters in our kitchen — I mean, there were 18″ of counter space next to the stove, and that was that — and similarly very little in the way of drawer storage. Magnets on the side of the fridge struck me, to be honest, as quite ingenious.

My husband felt differently. He essentially felt that storing the knives this way would result in all of us being maimed or killed.

When we moved to our current residence, we began a large-scale discussions that continued for two and a half years as we designed the kitchen we planned to build. “Where are we going to store the knives?” My husband initially expressed interest in one of those special knife-drawer designs people seem to like, but I found it fussy and a needless expense. What’s more, I don’t like the idea of having to open a drawer to get at a knife. When, at an estate sale, I found a knife block for $5, I bought the knife block and lugged it home. “When the kitchen is done, we can use this,” I said. My husband looked pleased. Though it was awkward to fit our ragtag collection of knives into this block, it could be done.

But the knife block presented numerous challenges from Day One. For one thing, when I got it home from the estate sale, I felt honor bound to clean it. It was dirty, after all, and I was going to put my knives in it: it would obviously be ideal for it to to not be completely fucking filthy.

Cleaning a knife block is not the easiest thing in the world. I mean, it’s not that cleaning it is precisely difficult — it requires less skill than cutting a good jack o’ lantern — but it requires patience to do it thoroughly and well. I used a lot of soapy water, and vinegar, and rags, and pipe cleaners. Years of accumulated layers of dust and grease had definitely left their marks on this thing. But I got it clean.  I took it out on the balcony to rest in the sunshine, and then I let the damn thing sit and sit and sit for several days before I decided the wood was dry enough.

Then, we arrived at another inevitable problem: it took me about half an hour to figure out how to arrange our motley knife collection in the limited slots and spaces of the block.

I managed to set it up so that the system was good enough. No one would be automatically harmed as the result of this knife block sitting in our kitchen. But it wasn’t great. There were only two slots that could hold chef’s knives, and we have three such knives that we use regularly. There’s a total of eleven knives that I want to have right at hand all the time. The knife block could store about half of them comfortably. I managed to get ten of them in safely, but it took some creative thinking. (The 11th knife, my left-handed serrated knife, I settled with keeping in a sheath in a drawer under the workspace.)

I spent probably an hour fiddling around with all the knives and the block. It was a process not unlike arranging one’s furniture in a new apartment. I learned that the chef’s knives couldn’t rest in the block the way knives always do in photos, with the edge of the blade facing down, handle ready to be grabbed. Our knives, placed just so, became wobbly and dangerously unbalanced; the handles were not designed in a manner that fit well with this block. I figured out that if I turned them so the edges of the blades faced up, the knives in vertical slots would be relatively stable, and that what’s more, the edges would stay sharper that way. I was able to nestle two chef’s knives into one vertical slot in this manner; it wasn’t perfect, but it was okay.

The horizontal slots in the block, which is where I’d’ve kept the chefs knives, ideally, were too narrow for those blades; instead, the relatively narrow-bladed, serrated bread knives went there. All the little paring knives went willy-nilly, two to a slot, in the other horizontal spaces, and the spot where the honing steel should go was where I kept an old favorite, a skinny little serrated knife that looks like junk but slices tomatoes and onions into perfect thin slices really well.

So the knives were housed, if imperfectly; but we lived with it. Over time, the top of the block collected dust, and the whole thing annoyed me as it took up a surprising amount of real estate on the kitchen counter. The system worked, technically, but I hated it. I hated this knife block, as I have always hated all knife blocks, and I never stopped thinking, “What would be a better way to handle this situation?”

After three years, someone posted an image to my Facebook wall. It was a knife block someone had made out of old books. I looked at the picture and I began to think.

Purple Rain in Ocean City: A Celebration, a Lament, a Learning Experience

I imagine that most people, when packing to spend a week in a rented apartment in a Mid-Atlantic resort town, do not make a point of carefully selecting knives, silicone spatulas, a good can opener, and a pair of serious kitchen scissors to take with them, along with a Microplane. They also wouldn’t pack a set of four mixing bowls and a stock pot, and they absolutely wouldn’t bother with two 9” cake pans. That is their business; that is their God-given right.

But I have, in 2016, done these things. And I have not regretted it for a moment.

We were in this same apartment last year, sharing the apartment with a close friend from our college days, G., and her husband and their children. Last year when we came, we had no idea of how the kitchen would be equipped; we expected to be able to cook sort of normally, and tried, but kind of failed. Part of it was, I admit, total apathy on my part, but a lot of it was due to a sense of frustration with the gear in the kitchen. The big stock pot we cooked spaghetti in, to serve with Cincinnati chili, smelled deeply of boiled crab. It wasn’t the worst thing in the world… but…. it wasn’t ideal. Especially for our crew: We don’t all like to cook, but we all like to eat. And it matters to us if we boil spaghetti and it tastes like old crab and Old Bay. We are not pleased by such things. It doesn’t feel like exciting Fusion Cookery to us. It feels weird and not at all pleasant.

So this year, I said to my husband, we weren’t going to screw around. Not only would we eat proper food in the apartment, at least some of the time, and not just live on crappy boardwalk food like French fries from Thrasher’s and sub-par gyros; but I also had plans to bake a birthday cake for my friend’s oldest child. This girlchild is not a little girl like my daughter: she is in her 20s, an adult, and someone who doesn’t require lots of fuss at her birthday, but I feel she deserves a little fuss. Her mother has two little boys, now, aged 5 and 7, and it always strikes me as possible that her firstborn might a little bit shorted in the birthday-celebration department, now that she’s got these two much younger little brothers. Maybe she doesn’t care. To be honest, she probably doesn’t, and would rather spend her birthday with her boyfriend anyhow. But I care; I wanted to make a cake for her. So I planned ahead.

A digression, but an important one: Some months ago, shortly after Prince died, I was in a Target in North Haven, Connecticut, with my friend Eliza. This is as novel to me as going to Harrod’s. While there, I discovered something that probably most Americans in my demographic already knew, which is that someone out there has been marketing Purple Rain cake, in a boxed mix, for some time now. If I watched TV and went to supermarkets more often, I’d’ve already known about this. But I don’t, and I don’t, so I didn’t. “What the hell is this?” I gasped to Eliza, who laughed. I insisted on buying it — its price had been slashed to something wretched, like $1.25 — and said, “I’m gonna bring it when we go hang out with G. in Ocean City this summer.” I posted to Facebook about this cake mix, and there was much discussion of preserving it in a kind of archival way, but it dawned on me that the obvious thing to do was to bake the Purple Rain cake as A.’s birthday cake, which we would be celebrating at the end of August. I put the box into the cabinet where I keep baking supplies and said to my daughter, “When I pack for us to go to the beach for a week, do not let me forget to pack this.” 

August came. I began to organize in earnest. G. and I exchanged dozens of emails regarding packing lists: what would we need for the beach, for the kitchen, to increase our general comfort. “Don’t forget laundry detergent,” we reminded each other. I remarked that because I’d been given a wonderful knife roll as a birthday present, I’d be able to safely and easily pack good kitchen knives. “Also some other things we’ll want in the kitchen,” I said. “Like a can opener that works, and a cheese grater that won’t cut our hands open, and stuff like that.”

I plotted and plotted. I set aside a stock pot to take with us. I debated taking a Dutch oven but decided against it (should have brought it! Next year). I pulled out two cake pans. I packed groceries (boxes of pasta, various shapes; canned beans; canned tuna in olive oil; canned olives; capers; a small block of Parmesan cheese). We made dozens of good meatballs and put them into strong-sealing plastic tubs that would be packed to travel in a cooler stocked with ice packs. I packed dishcloths and tea towels. I packed a cutting board. I packed my little silicone-coated kitchen tweezers, because I thought they might come in handy, though even I admitted it was a little crazy.

I remembered to pack things that had to do with going to the beach, too: I packed an ancient Indian print tapestry to use as a beach blanket and I packed cornstarch to use when we had to rub sand off our children. I packed Solarcaine. From our domestic Health & Beauty department, I packed a thermometer (natch) and a bottle of cold and cough medicine just in case (and yes, it came in handy).

So we arrived in Ocean City on Sunday afternoon and I unpacked our things and G. mocked me  (though she had also packed an astonishing amount of stuff, including several cans of chick peas, some cups of instant macaroni and cheese, and a whole watermelon). My husband mocked me as well, but I moved serenely through the kitchen knowing that I would have what I would need for the week.

Naturally, setting up the kitchen for the week required a trip to a supermarket. Some things, you don’t want to pack ahead when you’ve got a six hour drive to your destination. “We need milk, we need fruit….” To bake the Purple Rain cake, we’d also need eggs and a bottle of oil. G. and I spent less money than I had feared we might, on that grocery run, which I felt was a testimony to how well we had planned ahead. I admit, it wasn’t good that we had to buy a pound of butter and a bottle of vegetable oil — I could have handled that better — but as oversights go, these are small failures. We did remember to buy a can of ready-made cake frosting to decorate the cake. (I was not willing to hand-whip some kind of frosting together; besides which, a Purple Rain cake seemed to be the kind of thing that deserved some equally terrifying frosting to go on it. I mean, you wouldn’t make Swiss meringue to go on top of a Purple Rain cake, would you? No, you wouldn’t.)

It was self-evident that a can of lurid purple frosting  would be just the ticket for the Purple Rain cake. “AND it comes with Funfetti®! G. pointed out gleefully. We grabbed a box of little white birthday candles (but no further decorations, as we saw no need to gild a  funfetti’d purple lily). We drove back to the house feeling pleased with ourselves.

Monday mid-day, I started to assemble the Purple Rain cake batter with a kind of cockiness (“I bake cakes all the time, this’ll be a snap!”) that was quickly dimmed by apprehension as I realized that I was going to have a lot of small technical issues. It turned out, for example, that we had no measuring cups. We had no measuring spoons. It hadn’t occurred to me that the kitchen wouldn’t have these things and, astonishingly, it hadn’t occurred to me to pack them. I had silicone tweezers, but no measuring spoons. Worse, while the oven could be turned on, I had no ability to gauge how hot it was really getting: a huge disadvantage when baking.

The recipe called for, as I recall, three tablespoons of oil and one and a third cups of water. I eyeballed these amounts using a kitchen tablespoon and a teacup. I felt I was likely to get it roughly correct, but I worried, nonetheless, because I knew I was going to be baking these things in the wrong size pan anyhow; that is to say, I was, in a sense, screwed before I’d even begun. “It’ll be fine,” I assured myself. “I can totally do this shit.”

Totally doing this shit is what I did, and G. and I spent a lot of time laughing at how it got done, but boy did I not have much faith in that cake. You have to mix up the cake batter in one big bowl (if combining by hand, they recommend 450 strokes, which is a lot). Then you separate the batter into two bowls.


Icing GhostTo one bowl, you add purple dye that comes in a tiny packet about 1/4 of the size of a takeout ketchup packet; it is a tiny packet of what is surely purple toxic waste. (Photo taken by G., who observed that it looked like I’d drawn little teeny purple-featured ghost.)

You stir the purple dye into that one bowl of batter. You want to have one bowl of uniform purple batter and one bowlful of pristine white batter. (The white batter is white: it is white like Marshmallow Fluff, weirdly beautiful) Then you carefully pour the batters into the buttered-and-floured (in my case, buttered and cake mix’d) cake pans in such a way that concentric circles of cake batter form a beautiful bullseye in the pans. This is easier said than done. Actually, had I been at home, with my full batterie de cuisine, it would have been a snap, and I’m tempted to give a cake like this a roll once we’re home (using regular cake batter, maybe I’d add chocolate to half the batter). But under the circumstances, it was all a little challenging.

But we did it. And I took those 9” cake pans and I put them in the oven and set my phone’s timer for 30 minutes. I washed some dishes, and then went to relax on the porch for a bit.

About eight minutes later, G. came out to the porch. “I think the cakes are burning,” she said.

“Shit,” I said eloquently. I looked at my phone’s timer: I was supposed to have another 22 minutes to sit around being lazy. “That can’t be right.” I went into the kitchen and opened the oven. G was saying, “I think the oven runs really, really hot.” I tipped a knife several times into each cake, and the things were fully baked. It made no sense. I’d set the oven to 350° but it was like they’d baked at 450°, and boy howdy they were done. “Well, ok then,” I said. I then realized I had no cooling rack on which to rest the pans. I opened a cabinet wondering what I could find that might be a decent substitute, and I found a stack of those wicker “plates” that always seem to take up residence in summer-resort houses. I never knew what they were for, but pressed for a solution to my problem, I used them as cooling racks for the cake layers, and felt very clever. (G. tells me that people use these to lend support and strength to cheap paper plates. Now I know.)

I let the cakes cool for a good long while before attempting to pry them from the pans.IMG_7037

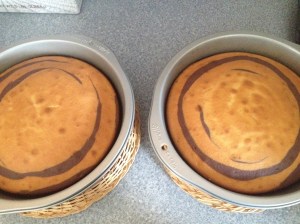
I figured that trying to tip out cakes that weren’t cool enough would be a recipe for disaster in what I already felt to be a tenuous situation. What I didn’t count on was that getting these things out would lead to disaster pretty much no matter what. I whacked and whacked the bottoms of those pans; I ran knives around the edges; I whacked and whacked some more. Both layers fell from the pans, eventually, landing fairly neatly on the waiting plates, but in each case, the bottom crust remained in the pan. The good part of this was, I could confirm IMG_7038visually that the cakes were, indeed, both swirled purple, and baked all the way through. The bad part was, the layers were all fucked up. What you see here is one layer of cake, turned onto a plate, and its bottom crumb, still firmly attached to the baking pan. It wasn’t an ideal situation. And I still had to frost the cake.

The usual way to frost a cake involves putting down what Cake People call a “crumb coat,” a thin coating of frosting that seals the cake. You do this after you’ve trimmed your cake layers so that they’re not domed anymore. In my case here, it was all folly. The cake layers were so thin and mangled there was nothing for it but to pop open the can of frosting and just have at it. I peeled as much cake “skin” as I could out of the pans, and placed them carefully where they belonged, and then I just started plopping tablespoons of frosting in strategic places. If I was careful, I reasoned, I could spread a thick layer of frosting atop one messy layer and carefully flip the second sad layer atop that, and then I could pray.

So that’s what I did. The frosted cake was far from a thing of beauty, but it was purple.

The Funfetti® didn’t hurt us, but I’m not sure it helped.

That evening, after dinner out at a restaurant, the two families came back to the apartment. The younger children were wildly excited about the cake. The 26 year old was politely amused. G. and I managed to light 26 tiny white candles without burning anyone or anything, and we sang “Happy Birthday” really quickly so as to avoid having wax melt onto the purple frosting — it seemed important to move fast, since the truth was we didn’t know if the frosting itself would melt, either.

Then we cut into the cake. Purple Rain Cake

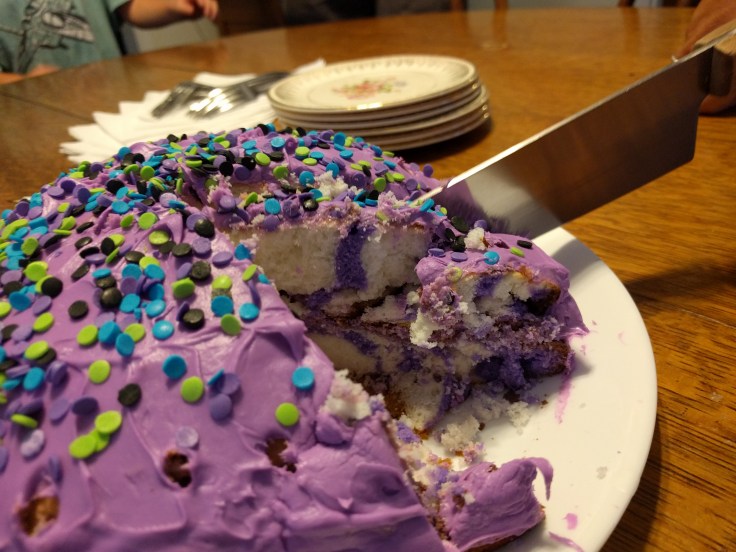
The crumb was so tender the slices of cake could barely be called slices. Doubtless if you use an 8” pan this isn’t so much of a problem — but the shallowness of the layers and their precarious condition meant that this was a cake that should really have been doled out with a large serving spoon. But the kids ate it up, and asked for seconds (denied). The leftovers were packed up and sent home with the birthday girl when she left the next day (to have her proper birthday celebration in the company of her boyfriend).

The cake itself tasted fine. It had a very soft, fine crumb, and was very sweet, but it lacked a distinct flavor; perhaps this is just how white cakes are. I have to admit, I’m not an expert on white (or purple) cakes. The frosting definitely had that synthetic tang we all know and love. I think the adults found it amusing, but not a cake they’d sneak slices of as the night wore on… and the fact that we had leftovers to pack up supports this judgement.

The rest of the week, when we needed dessert, we did what any self-respecting person on an ocean boardwalk would do. We bought ice cream and caramel corn and fudge. Some of us gorged on deep-fried Oreos…. but we can discuss that later.

Note for future rented apartment vacations:

What I didn’t pack that I should have: measuring cups and measuring spoons; an oven thermometer; pot holders; a cork trivet or two; perhaps a cooling rack, if I’m going to be stupid enough to bake a cake. And, most importantly, ingredients to bake and frost a decent cake.

Create a free website or blog at WordPress.com.

Up ↑